Googleアナリティクス、EC-CUBEのGA4設定方法(eコマーストラッキング対応)の解説です。
【2023年7月にGA4へ】
2023年7月に、既存バージョン「ユニバーサルアナリティクス」から、新規バージョン「GA4」に完全移行することがGoogleで発表されました。
今回、ECサイト(EC-CUBE)で「GA4」をGoogleタグマネージャー(
GTM )経由で設定する方法を解説します。
eコマーストラッキングも設定します。
【GA4初期設定の手順資料がほしい方】
Googleアナリティクス(GA4) Web担当者がしている初期設定の全手順の解説
※資料はGoogle docsです。購入後に送付する資料に閲覧URLを共有してますので、適宜、閲覧もしくはダウンロードしてください。
※加工編集も可能です。個人、社内、クライアントへの共有、資料作成の元資料としてもご活用ください。
Googleアナリティクス(GA4) Web担当者がしている初期設定の全手順の解説
【レクチャーしてほしい方】
設定がうまくできない、よく分からない、という方はレクチャーサポートしております。
Googleアナリティクス(GA4)個別講座
-GA4の使い方、初期設定、施策立案まで対応
【設定代行してほしい方】
設定出来ない、設定する時間がない、という方は代行サポートしております。
Googleアナリティクス(GA4)まとめて設定代行サービス
※EC-CUBE(イプシロン決済)の場合も対応事例あり
Web365とは
Web365は、外部Web担当者として、クライアントのWebサイトの集客力を高める施策を運用代行しています。
Web365について詳しく知りたい方は「Web365とは」ご覧ください。
この記事でわかること
GA4とGTMの設定
GA4のプロパティ発行と、GTMのアカウント発行、グローバルサイトタグの場所などは、下記に記載しておりますのでご確認ください。
【解説】googleアナリティクス、GA4の設定方法がうまくできないときの複数設定方法
まずは、GTMのグローバルサイトタグがコピペできる状態まで進めてください。
EC-CUBEのGA4設定
本題、まず、ECーCUBEの設定箇所は大きく2つです。
- レイアウト管理
- ブロック管理
ブロック管理
まずブロック管理で、必要なコードをつくります。
ブロック管理でGTMのグローバルサイトタグのブロックを作成する
まずは、GTMのグローバルサイトタグのブロック作成をします。
ブロック作成、ブロックをレイアウト管理で該当箇所に挿入、というイメージです。
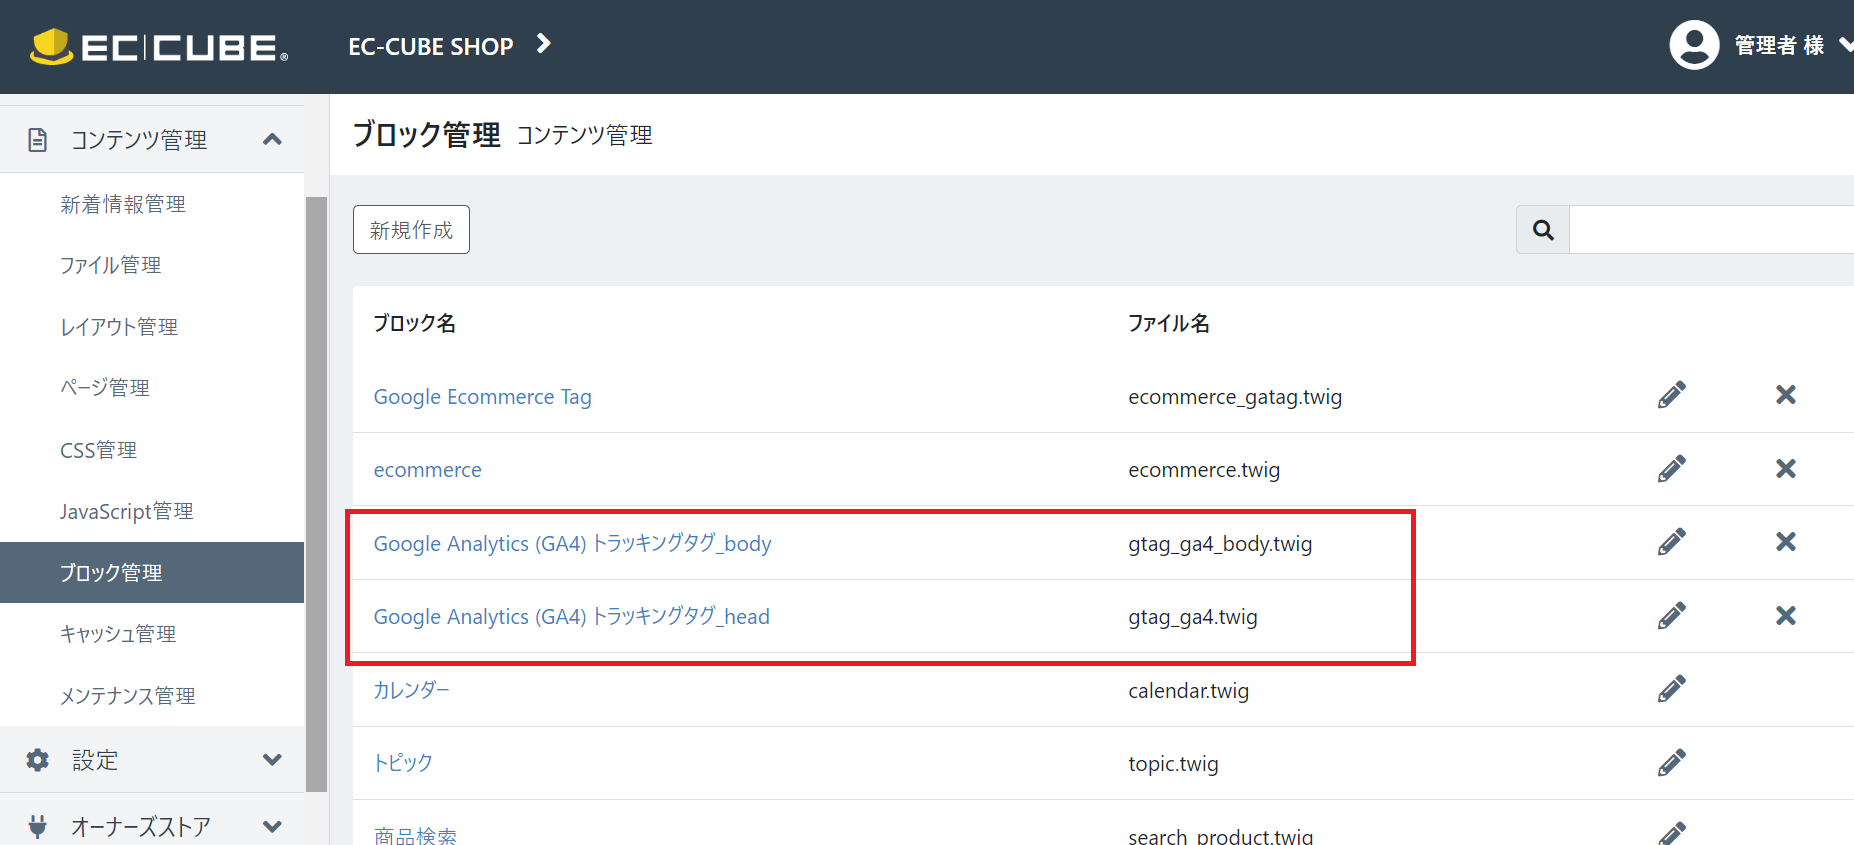
GTMのグローバルサイトタグは2つ
- head用のブロック
- body用のブロック
head用のブロック
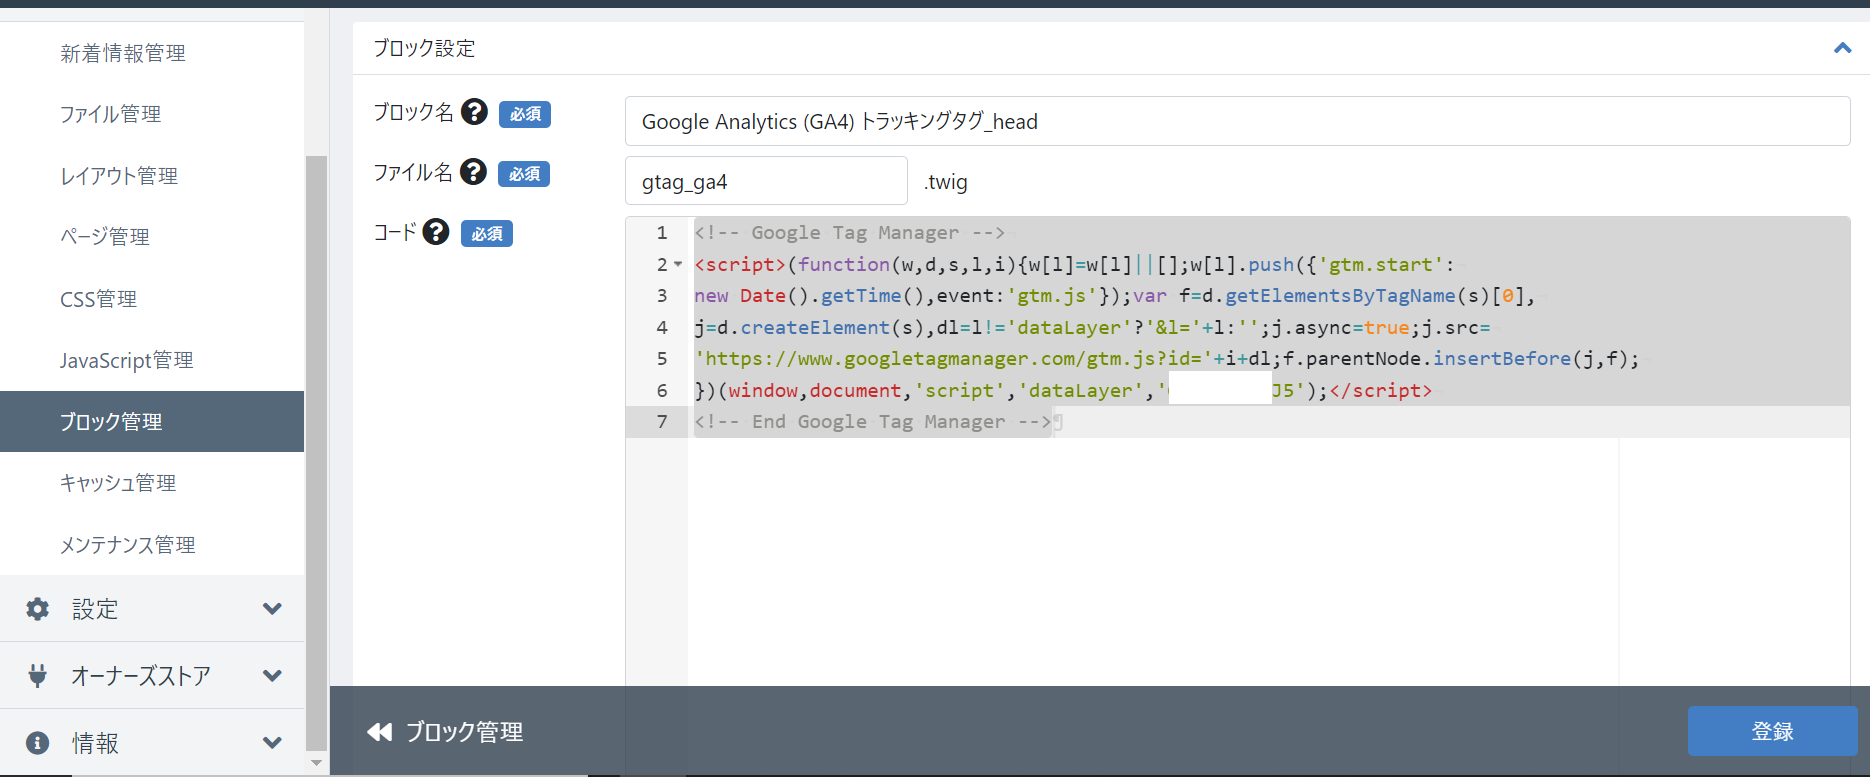
ブロック名:Google Analytics (GA4) トラッキングタグ_head
ファイル名:gtag_ga4_head
GTMのグローバルサイトタグのコード:
自身のGTM内のからコピーして貼る。下記コード例
<!-- Google Tag Manager -->
<script>(function(w,d,s,l,i){w[l]=w[l]||[];w[l].push({'gtm.start':
new Date().getTime(),event:'gtm.js'});var f=d.getElementsByTagName(s)[0],
j=d.createElement(s),dl=l!='dataLayer'?'&l='+l:'';j.async=true;j.src=
'https://www.googletagmanager.com/gtm.js?id='+i+dl;f.parentNode.insertBefore(j,f);
})(window,document,'script','dataLayer','GTM-〇〇');</script>
<!-- End Google Tag Manager -->
body用のブロック
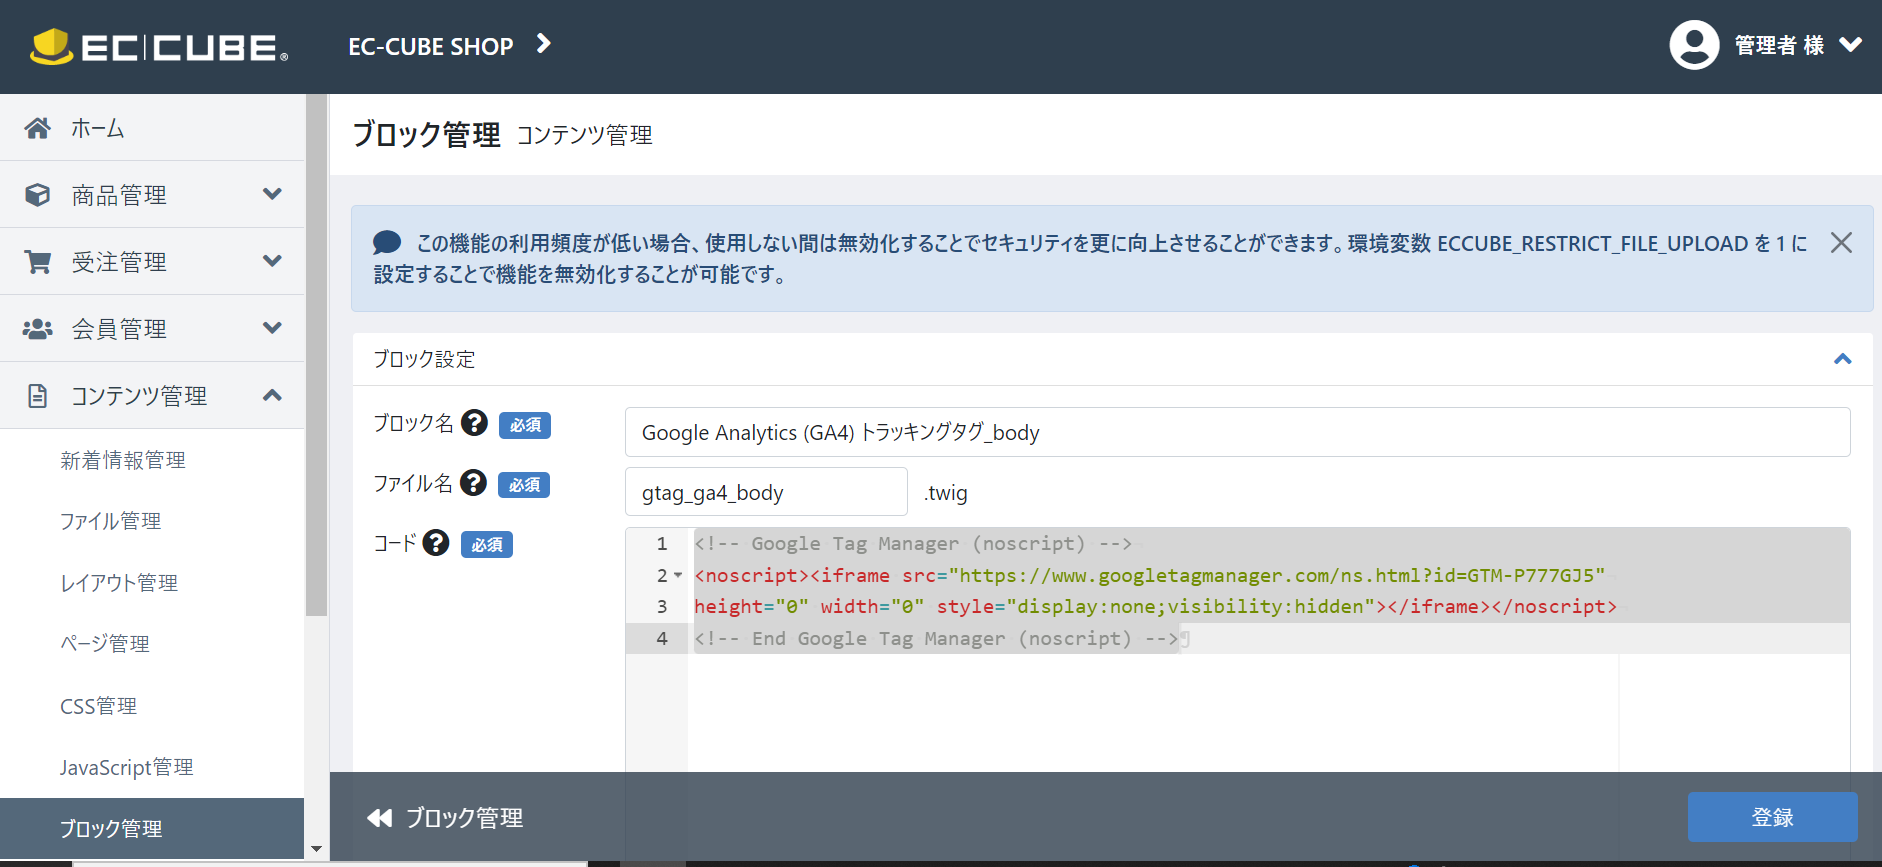
ブロック名:Google Analytics (GA4) トラッキングタグ_body
ファイル名:gtag_ga4_body
GTMのグローバルサイトタグのコード:
自身のGTM内のからコピーして貼る。下記コード例
<!-- Google Tag Manager (noscript) -->
<noscript><iframe src="https://www.googletagmanager.com/ns.html?id=GTM-〇〇"
height="0" width="0" style="display:none;visibility:hidden"></iframe></noscript>
<!-- End Google Tag Manager (noscript) -->
レイアウト管理で先のブロックを挿入
先に作成したブロックを該当箇所に挿入します。

トップページレイアウト
- 画像、右のブロック一覧からドラッグドロップで、
- <head></head>タグ内に
- ブロック「Google Analytics (GA4) トラッキングタグ_head」をドロップ
- <body>タグ直後に
- ブロック「Google Analytics (GA4) トラッキングタグ_body」をドロップ
- 登録をクリック

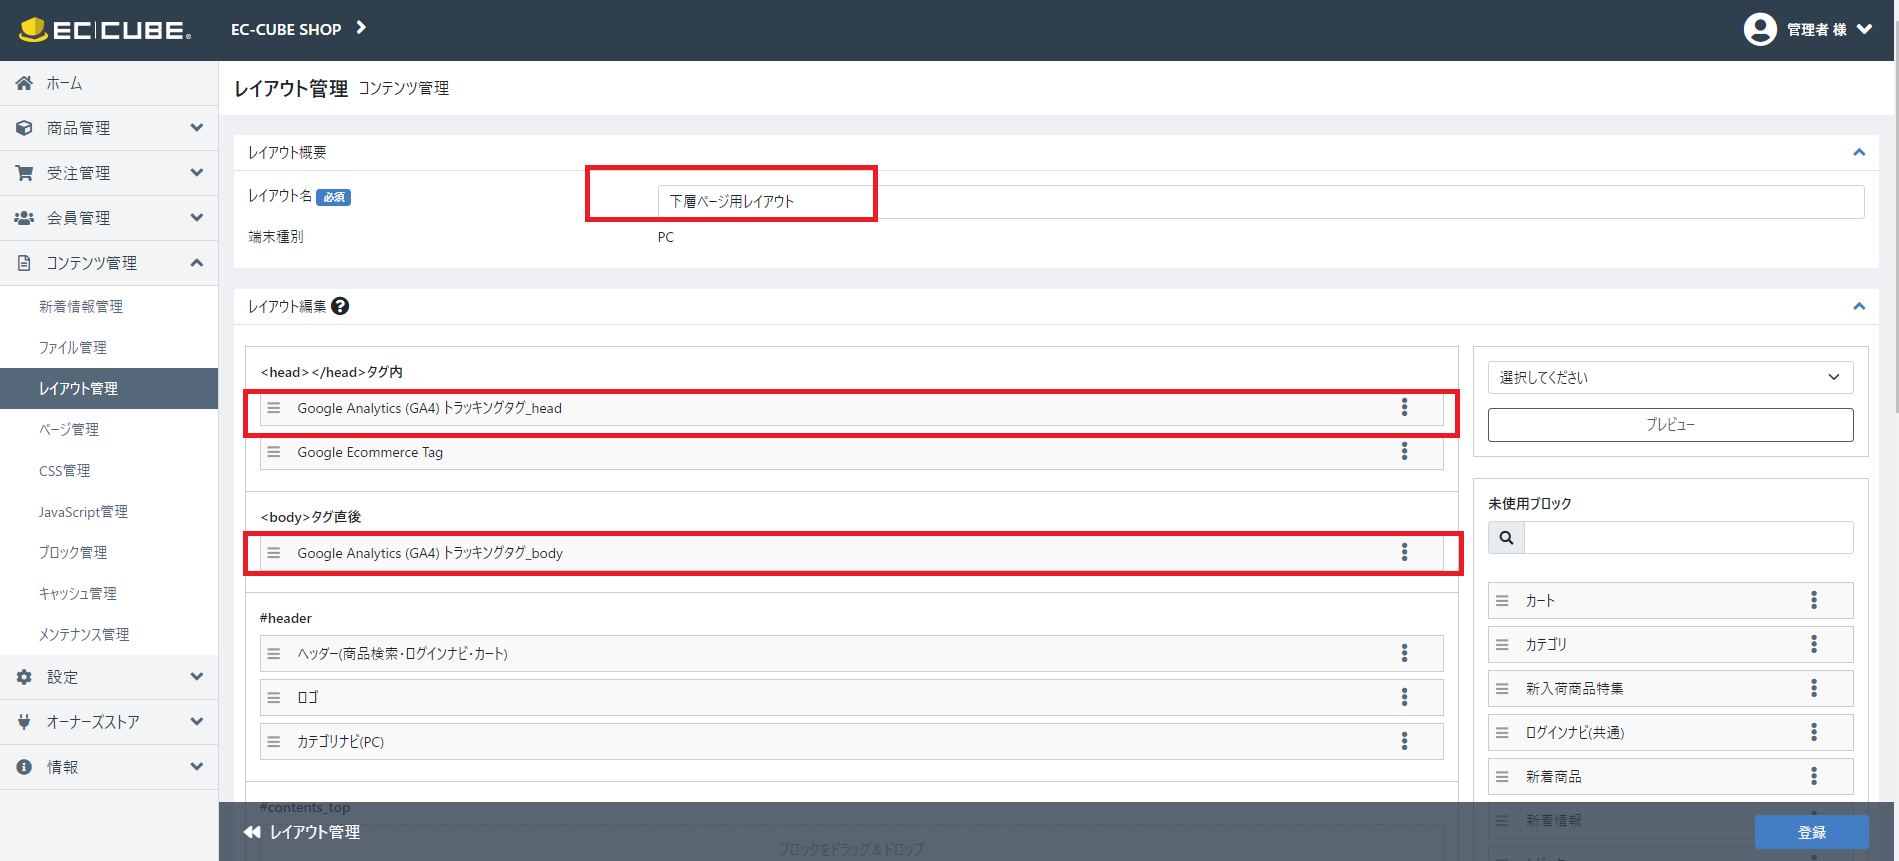
下層ページレイアウト
- 画像、右のブロック一覧からドラッグドロップで、
- <head></head>タグ内に
- ブロック「Google Analytics (GA4) トラッキングタグ_head」をドロップ
- <body>タグ直後に
- ブロック「Google Analytics (GA4) トラッキングタグ_body」をドロップ
- 登録をクリック
eコマーストラッキングの設定
eコマーストラッキングタグのブロックを作成します。
ブロック名:Google Ecommerce Tag
ファイル名:ecommerce_gatag
GTMのグローバルサイトタグのコード:
下記コード例(参考:
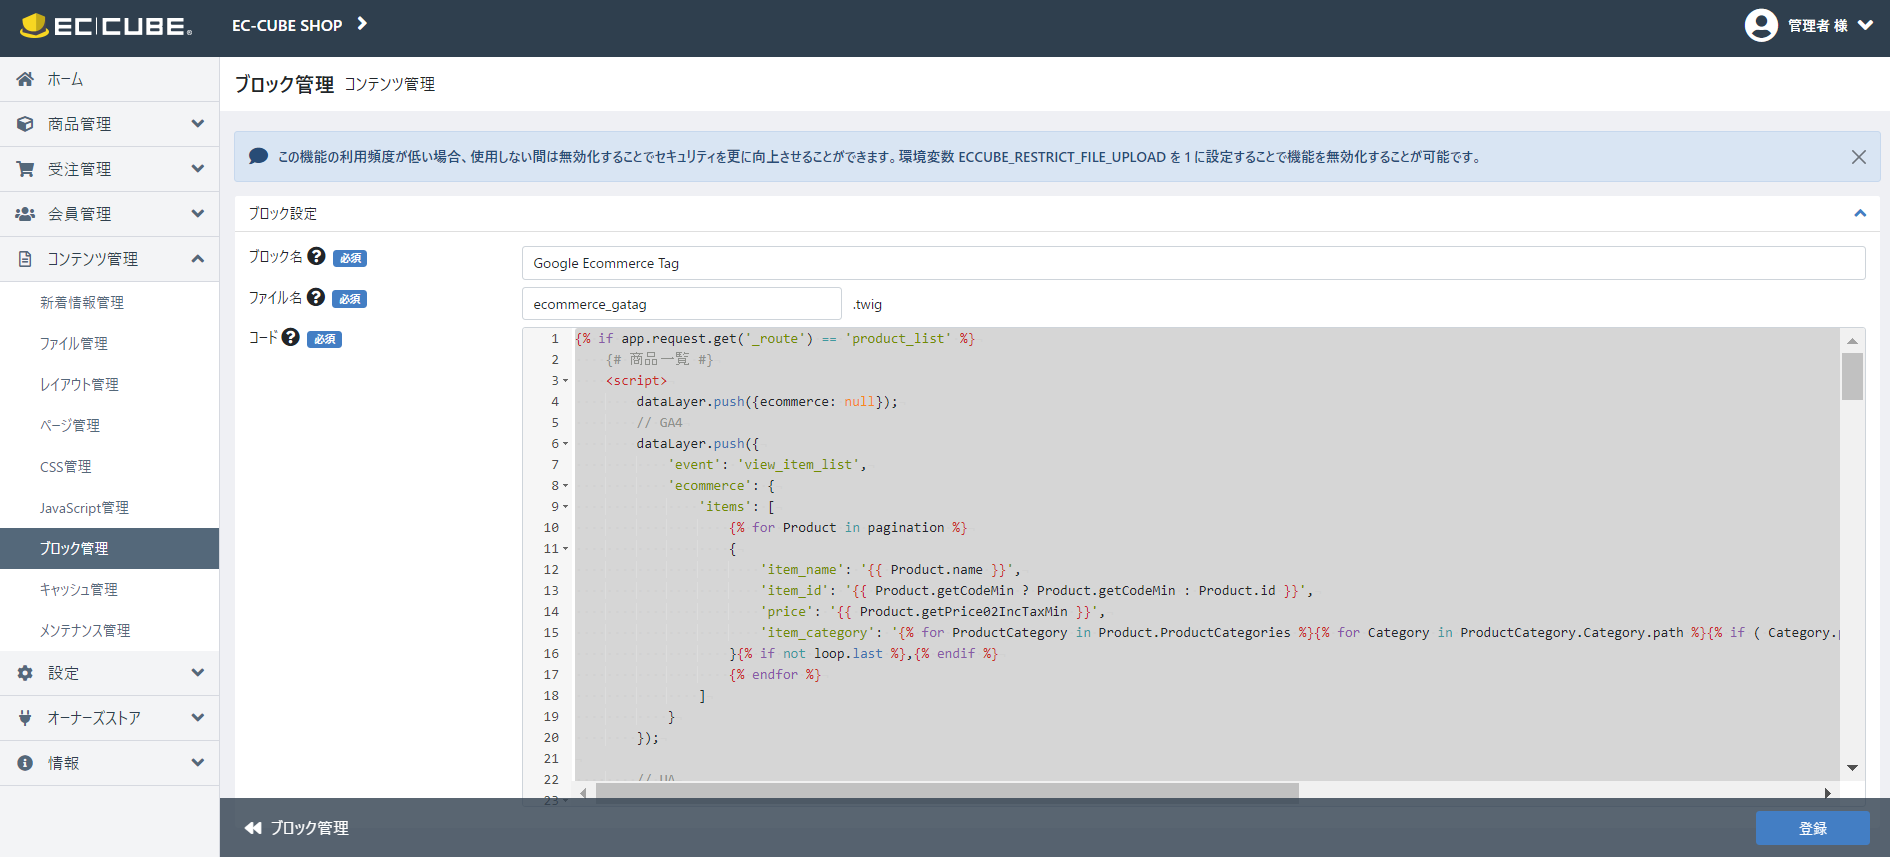
{% if app.request.get('_route') == 'product_list' %}
    {# 商品一覧 #}
    <script>
        dataLayer.push({ecommerce: null});
        // GA4
        dataLayer.push({
            'event': 'view_item_list',
            'ecommerce': {
                'items': [
                    {% for Product in pagination %}
                    {
                        'item_name': '{{ Product.name }}',
                        'item_id': '{{ Product.getCodeMin ? Product.getCodeMin : Product.id }}',
                        'price': '{{ Product.getPrice02IncTaxMin }}',
                        'item_category': '{% for ProductCategory in Product.ProductCategories %}{% for Category in ProductCategory.Category.path %}{% if ( Category.parent is not null ) %}{{ Category.Parent.name }}:{{ Category.name }}{% endif %}{% endfor %}{% endfor %}',
                    }{% if not loop.last %},{% endif %}
                    {% endfor %}
                ]
            }
        });

        // UA
        dataLayer.push({
            'ecommerce': {
                'currencyCode': 'JPY',
                'impressions': [
                    {% for Product in pagination %}
                    {
                        'name': '{{ Product.name }}',
                        'id': '{{ Product.getCodeMin ? Product.getCodeMin : Product.id }}',
                        'price': '{{ Product.getPrice02IncTaxMin }}',
                        'category': '{% for ProductCategory in Product.ProductCategories %}{% for Category in ProductCategory.Category.path %}{% if ( Category.parent is not null ) %}{{ Category.Parent.name }}:{{ Category.name }}{% endif %}{% endfor %}{% endfor %}',
                    }{% if not loop.last %},{% endif %}
                    {% endfor %}
                ]
            }
        });

    </script>

{% elseif app.request.get('_route') == 'product_detail' %}
    {# 商品詳細 #}
    <script>
        // Measure a view of product details. This example assumes the detail view occurs on pageload,
        dataLayer.push({ecommerce: null});  // Clear the previous ecommerce object.
        // GA4
        dataLayer.push({
            'event': 'view_item',
            'ecommerce': {
                'items': [{
                    'item_name': '{{ Product.name }}',
                    'item_id': '{{ Product.getCodeMin ? Product.getCodeMin : Product.id }}',
                    'price': '{{ Product.getPrice02IncTaxMin }}',
                    'item_category': '{% for ProductCategory in Product.ProductCategories %}{% for Category in ProductCategory.Category.path %}{% if ( Category.parent is not null ) %}{{ Category.Parent.name }}:{{ Category.name }}{% endif %}{% endfor %}{% endfor %}',
                    'quantity': '1'
                }]
            }
        });

        // UA
        dataLayer.push({
            'ecommerce': {
                'detail': {
                    'products': [{
                        'name': '{{ Product.name }}',         // Name or ID is required.
                        'id': '{{ Product.getCodeMin ? Product.getCodeMin : Product.id }}',
                        'price': '{{ Product.getPrice02IncTaxMin }}',
                        'category': '{% for ProductCategory in Product.ProductCategories %}{% for Category in ProductCategory.Category.path %}{% if ( Category.parent is not null ) %}{{ Category.Parent.name }}:{{ Category.name }}{% endif %}{% endfor %}{% endfor %}',
                    }]
                }
            }
        });
    </script>

{% elseif app.request.get('_route') == 'cart' %}
    {# カートに追加 #}
    <script>
        // Measure when a product is added to a shopping cart
        dataLayer.push({ecommerce: null});  // Clear the previous ecommerce object.
        // GA4
        dataLayer.push({
            'event': 'add_to_cart',
            'ecommerce': {
                'items': [
                    {% for CartIndex,Cart in Carts %}
                    {% for CartItem in Cart.CartItems %}
                    {% set ProductClass = CartItem.ProductClass %}
                    {% set Product = ProductClass.Product %}
                    {
                        'item_name': '{{ Product.name }}',
                        'item_id': '{{ Product.getCodeMin ? Product.getCodeMin : Product.id }}',
                        'price': '{{ Product.getPrice02IncTaxMin }}'
                    }{% if not loop.last %},{% endif %}
                    {% endfor %}
                    {% endfor %}
                ]
            }
        });

        // UA
        dataLayer.push({
            'event': 'addToCart',
            'ecommerce': {
                'currencyCode': 'JPY',
                'add': {
                    'products': [
                        {% for CartIndex,Cart in Carts %}
                        {% for CartItem in Cart.CartItems %}
                        {% set ProductClass = CartItem.ProductClass %}
                        {% set Product = ProductClass.Product %}
                        {
                            'name': '{{ Product.name }}',
                            'id': '{{ Product.getCodeMin ? Product.getCodeMin : Product.id }}',
                            'price': '{{ Product.getPrice02IncTaxMin }}',
                            'quantity': {{ CartItem.quantity }}
                        }{% if not loop.last %},{% endif %}
                        {% endfor %}
                        {% endfor %}
                    ]
                }
            }
        });

    </script>

{% elseif app.request.get('_route') == 'shopping_complete' %}
    {# 購入完了 #}

    {% if Order.id %}
        <script>
            dataLayer.push({ecommerce: null});
            // GA4
            dataLayer.push({
                'event': 'purchase',
                'ecommerce': {
                    'transaction_id': '{{ Order.order_no }}',
                    'affiliation': '{{ BaseInfo.shop_name }}',
                    'value': '{{ Order.subtotal }}',
                    'tax': '{{ Order.tax }}',
                    'shipping': '{{ Order.delivery_fee_total }}',
                    'currency': 'JPY',
                    'items': [
                        {% for OrderItem in Order.MergedProductOrderItems %}
                        {
                            'item_name': '{{ OrderItem.product_name }}',
                            'item_id': '{{ OrderItem.product_code ? OrderItem.product_code : OrderItem.product.id }}',
                            'price': '{{ OrderItem.price_inc_tax }}',
                            'item_category': '{% for ProductCategory in OrderItem.Product.ProductCategories %}{% for Category in ProductCategory.Category.path %}{% if ( Category.parent is not null ) %}{{ Category.Parent.name }}:{{ Category.name }}{% endif %}{% endfor %}{% endfor %}',
                            'quantity': {{ OrderItem.quantity }}
                        }{% if not loop.last %},{% endif %}
                        {% endfor %}
                    ]
                }
            });

            // UA
            dataLayer.push({
                'ecommerce': {
                    'purchase': {
                        'actionField': {
                            'id': '{{ Order.order_no }}',
                            'affiliation': '{{ BaseInfo.shop_name }}',
                            'revenue': '{{ Order.subtotal }}',
                            'tax': '{{ Order.tax }}',
                            'shipping': '{{ Order.delivery_fee_total }}'
                        },
                        'products': [
                            {% for OrderItem in Order.MergedProductOrderItems %}
                            {
                                'name': '{{ OrderItem.product_name }}',
                                'id': '{{ OrderItem.product_code ? OrderItem.product_code : OrderItem.product.id }}',
                                'price': '{{ OrderItem.price_inc_tax }}',
                                'category': '{% for ProductCategory in OrderItem.Product.ProductCategories %}{% for Category in ProductCategory.Category.path %}{% if ( Category.parent is not null ) %}{{ Category.Parent.name }}:{{ Category.name }}{% endif %}{% endfor %}{% endfor %}',
                                'quantity': {{ OrderItem.quantity }}
                            }{% if not loop.last %},{% endif %}
                            {% endfor %}
                        ]
                    }
                }
            });
        </script>
    {% endif %}

{% endif %}
レイアウト管理で先のブロックを挿入
先に作成したブロックを該当箇所に挿入します。
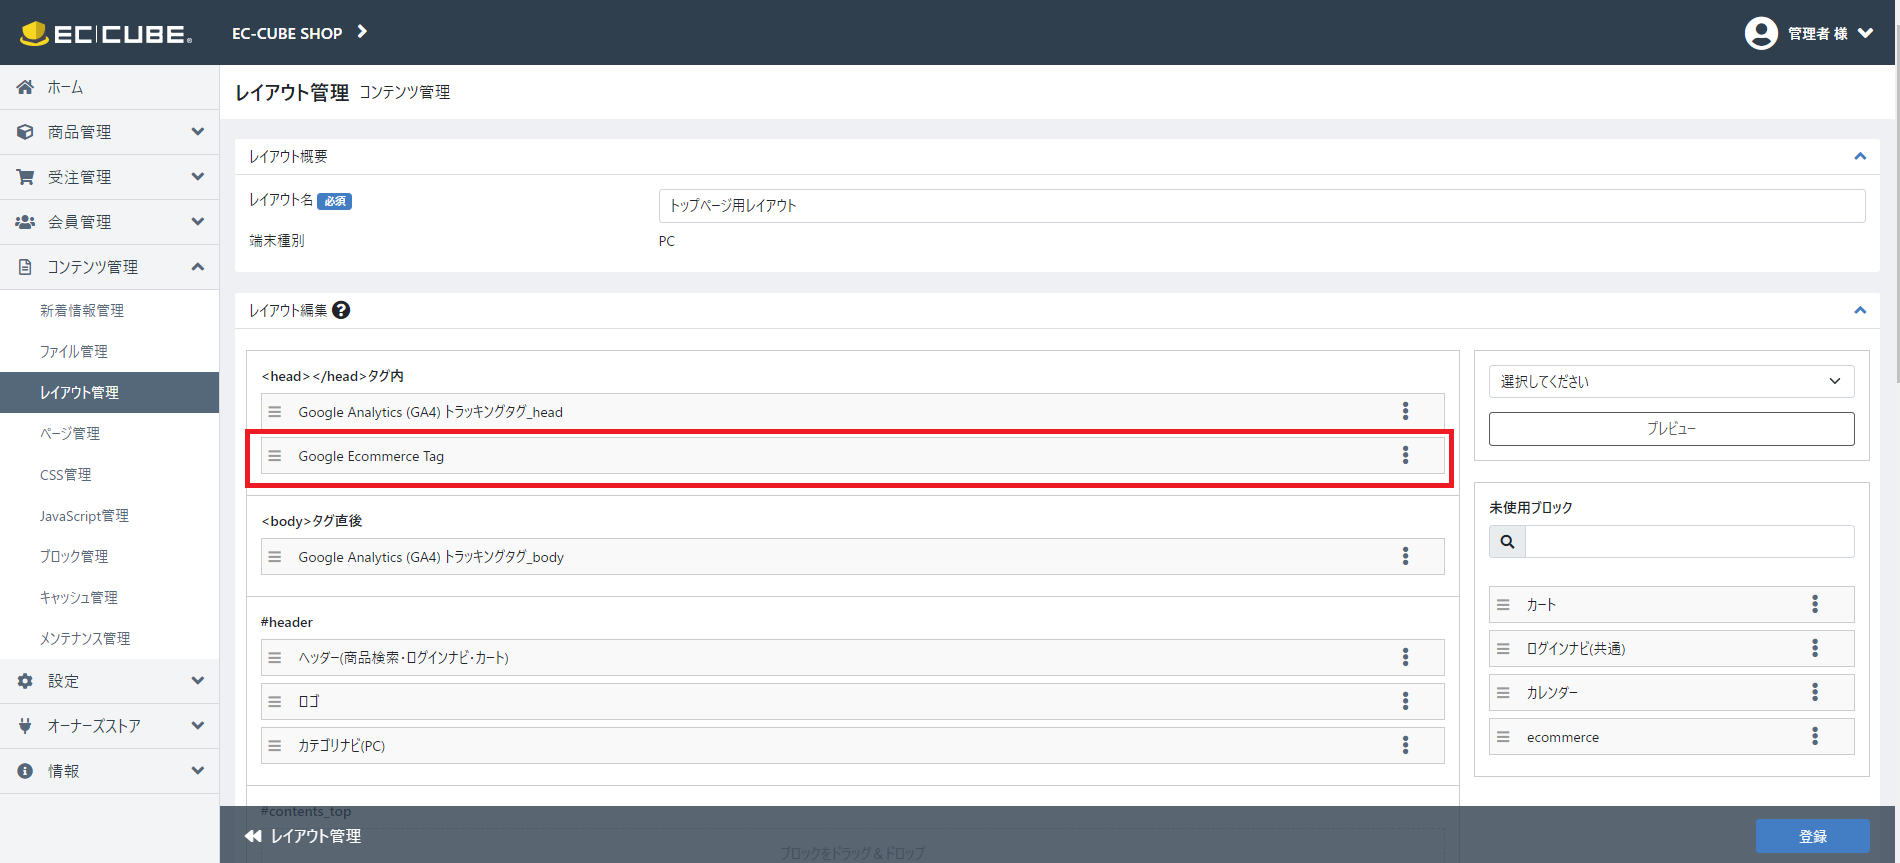
トップページレイアウト
- 画像、右のブロック一覧からドラッグドロップで、
- <head></head>タグ内に
- ブロック「 Google Ecommerce Tag 」をドロップ
- 登録をクリック
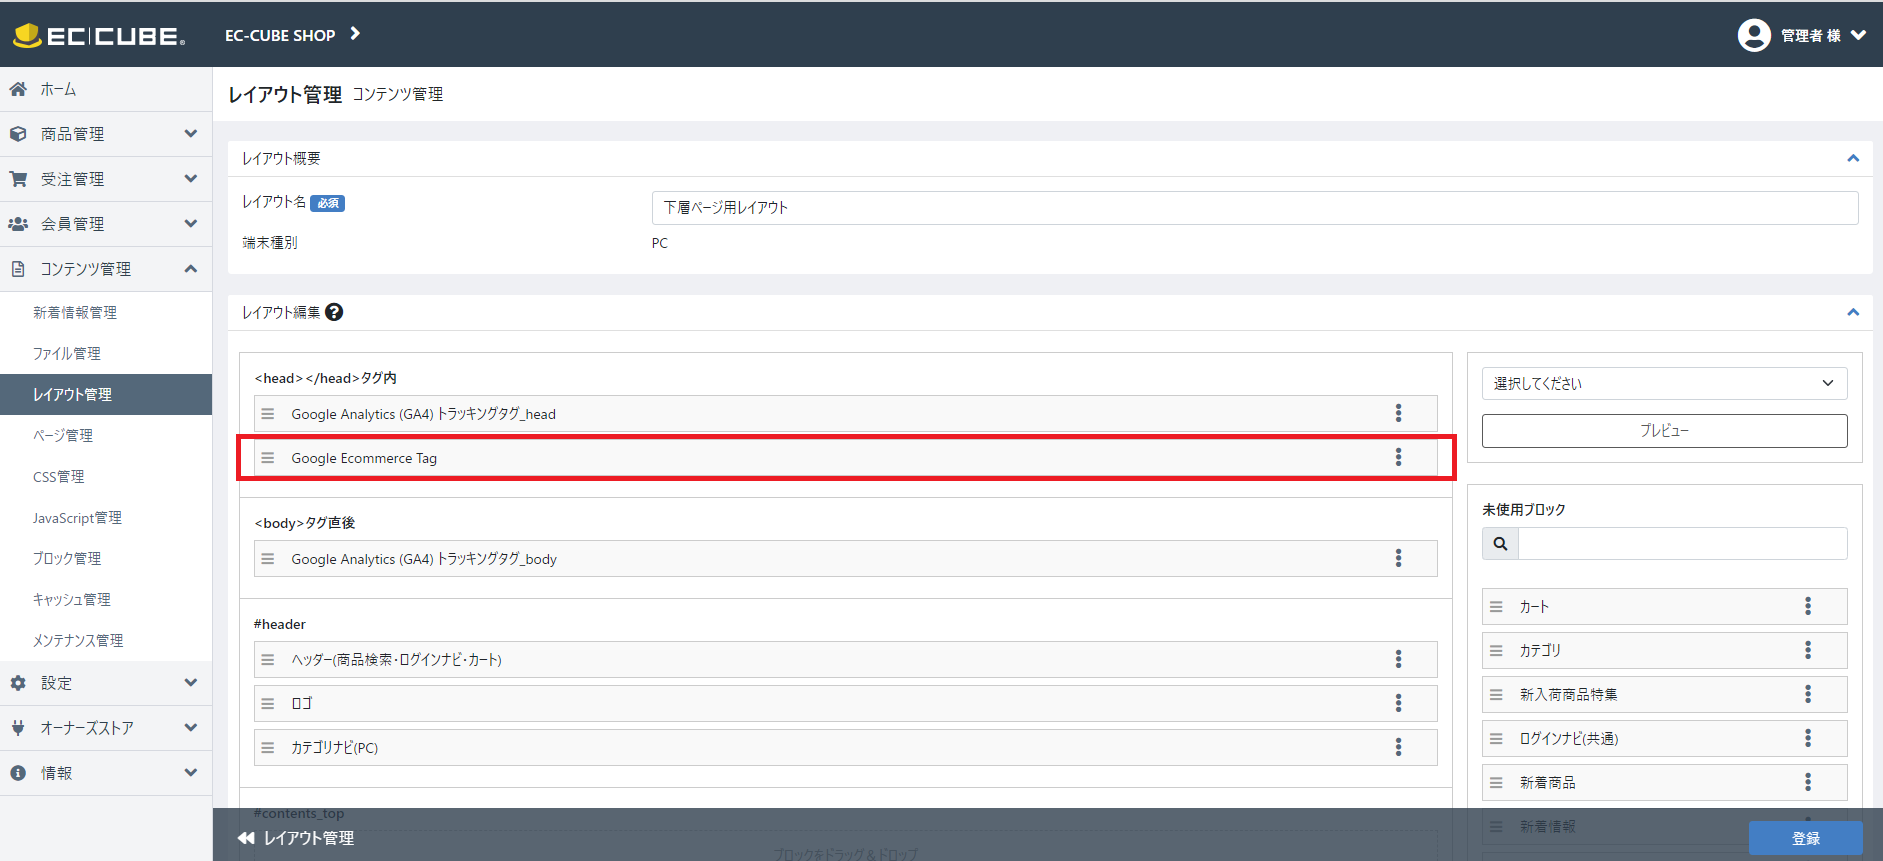
下層ページレイアウト
- 画像、右のブロック一覧からドラッグドロップで、
- <head></head>タグ内に
- ブロック「Google Ecommerce Tag」をドロップ
- 登録をクリック
以上です。
テストのチェック方法
テストのチェック方法は、
- GTMのプレビューで確認
- GA4内のdebug Viewで確認
- GA4内のレポート>リアルタイムでの確認
があります。
3については、下記記事に記載してますので、ご確認ください。
【解説】googleアナリティクス、GA4の設定方法がうまくできないときの複数設定方法
当記事が有益だと思っていただけた方
当記事が有益だと思っていただけた方は、当サイトの活動についてサポートいただけるとありがいたいです。サポート決済ページはこちら
手順や見方、個別課題について受講したい方
GA4の初期設定や見方、考え方、個別の課題について課題解決型の講座です。
Googleアナリティクス(GA4)個別講座
-GA4の使い方、初期設定、施策立案まで対応
設定代行してほしい方
設定出来ない、設定する時間がない、という方は代行サポートしております。
Googleアナリティクス(GA4)まとめて設定代行サービス
※EC-CUBE(イプシロン決済)の場合も対応事例あり
Web改善を相談したい方
サイト計測・分析で相談したい方、そもそものWebサイトの分析提案や改善実行など相談したい方はこちらよりお気軽にご連絡ください。
Web制作+Webマーケティングの個別講座開講中
Web365はWeb担当者のスキルセットである
サイトを変更する「提案力」と「技術力」について個別指導しております
・Webで集客するための「考え方」を知りたい方
・サイトの制作改善のセオリーを知りたい方
・自身のサイトでケーススタディをしたい方
・サイトの制作改善の「技術的なスキル」を習得したい方
・分析から改善運用まで自身でしたい方
・Googleアナリティクスの設定、分析から改善施策の立案、レポート作成まで自身でしたい方
どうぞWeb365の「Webサイト制作、Webマーケティングの知識スキル習得するためのオーダーメイド個別講座」をご覧ください。
外注のWeb担当者として「制作」と「マーケティング」で単発/継続でサポートします。
Web365は貴社のWeb担当者として、制作改善運用をワンストップサポートしています
・成果にこだわるサイト制作改善をお望みの方
・自社にとって最適なweb制作会社、コンサル会社がいないとお困りの方
・分析から改善運用まで一括で依頼したい方
是非Web365までご相談ください。
【パートナー募集】
Web制作、Webコンサル、広告代理店、フリーランスの方々へのWeb改善プランの提供
Web365は同業他社/フリーランスの方々にも当方のWeb改善プランを提供し、クライアントサイトの改善プランのサポートや社内担当者へのレクチャーをサポートしています
・クライアントへのWebマーケティング、Web改善のプラン検討している方
・社内のWebマーケティングのリテラシーを高めたい方
・分析から改善運用まで一括でサポート依頼したい方
Web365は同業他社/フリーランスの方々にも当方のWeb改善プランを提供し、クライアントサイトの改善プランのサポートや社内担当者へのレクチャーをサポートしています
・クライアントへのWebマーケティング提案がしたいプラン作成をサポート
・クライアントへのWeb改善プラン実行のディレクションサポート
・社内のGoogleアナリティクスなどのレクチャー
・クライアントへのサイト分析から改善運用企画のアドバイザリーサポート
・Web系フリーランスへのWeb改善プランの提案企画書の作成サポート
・クライアントへのWeb広告運用代行
・クライアントへの計測ツール設定代行(Googleアナリティクス、eコマース、ヒートマップClarityなど)
まずは、お気軽にMTGでれきばと思いますので、Web365までご相談ください。